1. Crimped Hair with Chain Details

Crimping works best on wavy or curly hair that already has texture to grip. Start with day-two hair—fresh hair won’t hold the crimped pattern. Divide your hair into four quadrants and work section by section with a crimping tool, keeping the plates parallel to your scalp. Once crimped, you’ll notice the texture stacks immediately, creating volume that reads loud and clear. Add a delicate chain by threading it through a few crimped sections near your face, securing with bobby pins that match your hair color. The crimped hair festival look thrives on this kind of controlled chaos—the crimp provides structure, the chain adds the ‘I found this at a thrift store’ detail that makes it feel real.
2. Messy Beach Waves on Fine Hair

The messy beach waves tutorial starts with damp hair and a sea salt spray applied to the mid-lengths and ends. Braid your hair loosely while wet, leaving pieces around your face out, then let it air dry or speed it up with low heat. Once dry, unravel the braid and run your fingers through to break up the waves into something that looks genuinely wind-tossed rather than styled. Fine hair tends to fall flat by afternoon, so the trick is spraying at the roots before you start, not after—that keeps everything from looking limp by 2 p.m. Day-two waves actually work better here; the texture catches and holds longer when your hair’s already had a chance to reset.
3. Half-Up Twist for Minimal Effort

The easy half-up twist tutorial takes about 3 minutes once you’ve done it twice. Section off the top third of your hair, divide it into two strands, and twist them around each other loosely without pulling—tension kills the relaxed vibe. Secure at the back of your head with two bobby pins crossed in an X shape, which grips better than a single pin on fine or medium hair. Leave some flyaways visible; they soften the whole thing. If your twist slips by dinner, you’re pinning it wrong, so anchor those bobby pins at an angle rather than straight in. The real move is how little you need to do to make this read as intentional.
4. Sleek High Ponytail with Silk Scarf

A sleek high ponytail tutorial lives or dies on how smooth your crown sits. Brush your hair firmly from roots to ends, smoothing as you go, then gather at the crown and secure with a clear elastic—never colored, as it shows through and disrupts the clean line. Wrap a thin section of hair around the elastic base to hide it, pinning the wrap underneath so it disappears. Now wrap a silk scarf (bright, jewel-toned, patterned—whatever matches your vibe) around that base, tying it at the back with a small knot or tucking the ends under. Silk won’t slip like cotton, won’t fray your hair, and transforms a basic ponytail into something that actually looks considered without feeling overdone.
5. Twisted Blonde Bun for Playful Park Days

A half-up bun tutorial wavy hair starts with damp waves and a simple twist—no bobby pins required if your hair has texture. Grab the top section from temple to temple, twist it loosely toward the back of your head, then wrap the ends around the base and tuck. The messiness is the point. Fine or medium hair works best here because thick hair needs an extra elastic to keep the twist from unraveling by hour four. Redo the front pieces after lunch (takes two minutes) and you’re good until dinner.
6. Shell-Clipped Half-Up Twist for Festival Mornings

The half up twist hair tutorial with shell clips is boho without trying. Part your hair down the middle, take a two-inch section from one side, twist it back loosely, and clip it with a pair of shell hair clips (the iridescent kind reads better in natural light). Repeat on the other side. Your hair should look like it happened by accident. Do this on wavy hair for the best texture—straight hair needs a wave spray first, which adds one extra step you probably won’t remember on a festival morning.
7. Loose Side Braid for Peaceful Water’s Edge

Wavy hair loves an easy side braid tutorial. Work from the side of your head rather than the center—this shifts the entire look from polished to explored. Braid loosely; tight braids look planned and intentional in a way that contradicts the vibe. The braid should take eight minutes and look like you started it while lost in thought. Add one small charm or shell accessory halfway down the braid to suggest you found something pretty during your walk, then pull a few face-framing pieces free. Texture and movement matter more than precision here.
8. Soft Romantic Volume with the <b>Heatless Curls Sock Method</b>

The heatless curls sock method works best on damp hair, ideally overnight or for 6-8 hours minimum. Wrap small sections around a rolled sock, secure with a bobby pin, and let gravity do the work—no heat required. Straight hair holds better than very fine textures, though wavy hair creates bouncier results. Day-two hair actually performs better; second-day texture grips the curl and prevents it from falling flat by lunch. Roll hair while damp, sleep on it, unroll in the morning, and you’ve got volume that reads as intentional without feeling overdone.
9. Sun-Kissed Lob with Texture and Movement

A lob hits collarbone or just below, which means you have enough length to create actual waves instead of just texture. Start with damp hair, apply a sea salt spray to the mid-lengths and ends, and either air-dry with your head tilted or use a diffuser on low heat. The goal isn’t perfection—it’s that lived-in look where some waves define and others just soften the overall shape. Medium and wavy hair get there faster; straight hair needs the spray plus intentional scrunching as it dries. By day two or three, when the texture settles and the spray has done its job, the tousled lob beach waves look even better because the strands have started to clump naturally without looking wet or overly styled.
10. Loose <b>Boho Side Braid Festival</b> Look

A loose side braid works on wavy and curly hair straight out of the shower—no styling required beyond air-drying. Start the braid at your temple, braid loosely down to mid-length, and stop before the ends so the tail looks undone. Tuck small flowers, silk ribbons, or even a thin chain into the braid as you weave; they sit naturally in the texture without needing to be pinned. This style holds eight to ten hours in humid conditions and still looks intentional at hour twelve, which makes it perfect for outdoor festivals or all-day garden hangs. Skip this if your hair is shorter than shoulder-length—the braid needs minimum length to sit visible and distinct from the rest of your hair.
11. Deep Waves with Classic Glamour

The glamorous hollywood waves tutorial approach means rolling sections around a curling iron barrel, holding for 15 seconds, then letting them cool in your palm before releasing—this sets the wave pattern instead of letting it drop immediately. Straight and medium-textured hair hold these waves for hours; thick hair sometimes needs a light hairspray to keep the shape all day. The challenge isn’t the technique—it’s the time. First run-through takes 25-30 minutes. By your third attempt you’re down to 15, and by attempt five you’re working on autopilot. This is advanced territory because each wave needs to mirror the one next to it, creating that signature S-curve from scalp to end. If you have fine or very curly hair, the iron often creates frizz or the waves sit too tight, so consider whether this matches your hair’s natural behavior.
12. Loose Romantic Braided Bun with Face-Framing Tendrils

A low braided bun tutorial starts with damp hair—not soaking, just towel-dried. Separate a section from each temple, braid each loosely down to your jawline, then gather everything into a low ponytail at the nape. The tendrils stay out. Twist the ponytail gently, coil it into a bun, and pin with bobby pins that match your hair color so they disappear. You’ll need about 12 minutes the first time. By the third attempt, you’re down to 7. Pull a few wisps from the braid itself—that messy, “I didn’t try too hard” texture is the whole point, and it’s what makes this look work at a waterfront dinner where the lighting is soft and forgiving.
13. High-Shine Wet Look Bob

The wet look bob tutorial is deceptive. It looks like you dunked your head in water. You didn’t. Start with clean, blow-dried hair and apply a lightweight gel to the mid-lengths and ends—the kind that has zero flake and catches light like glass. Comb through slowly so the product distributes evenly without clumping. The shine is everything here because it reads as intentional, not damp. Tuck one side behind your ear. This works on straight and wavy hair, though straight hair shows the geometry more clearly—those sharp angles at the jawline that make you look like you just walked out of a gallery opening. The look holds about 8 hours before it starts to feel sticky, so save it for daytime or early evening.
14. Minimalist Slicked-Back Low Bun

Brush hair straight back from the hairline with a small, stiff-bristled brush and a smoothing cream that controls flyaways without adding weight. The smoothing cream matters—cheap ones leave white residue. Apply it to damp hair before blow-drying so everything sets in place. Gather hair into a low ponytail at the exact base of your skull, then twist and pin into a tight, flat bun. The slicked back low bun tutorial demands precision: every hair accounted for, no bumps underneath, the line from forehead to crown unbroken. Check the back in a hand mirror. If you see texture, you’ve missed a section. This is the style for poolside days when you’re reading and the sun’s reflecting off your own hair. It’s also the look that works if you didn’t wash your hair yesterday—in fact, day-two hair grips better than freshly shampooed.
15. Undone Waves on a Lob

An undone waves lob tutorial begins with the cut—shoulder length or slightly longer, slightly choppy through the ends so waves have somewhere to break. Blow-dry your damp hair smooth first, then use a curling iron (medium barrel) to wrap sections away from your face, leaving the last 2 inches of each section unwrapped so the ends flip out naturally instead of curling under. Don’t aim for matching waves. Aim for the chaos of a cafe morning in Paris where you brushed your hair once and called it done. Rough-dry some sections, let others sit smooth. Spritz the finished waves with a lightweight texture spray—the kind that adds grip without looking wet or crunchy. This hairstyle works on everyone because the length and layers hide mistakes, and the tousled texture forgives imprecision. Day two? Even better. The waves soften and intermix, and you just tuck one side behind your ear.
16. Sculptural Braided Updo

A sculpted updo tutorial requires one rehearsal before you wear it anywhere. You’re essentially creating an architectural shape with your hair—geometric, intentional, with clean lines that don’t apologize. Start with straightened hair. Create a deep side part and brush the smaller side into a low ponytail. Divide the larger side into two vertical sections and French braid each one (tight, controlled, no loose pieces) down to the nape, where you join them with the ponytail. Now twist the combined section tightly and wrap it around the base of the ponytail into a flat spiral, pinning it so the pattern shows. This takes 20 minutes if you’ve practiced. The first time, give yourself 40. One warning: this style doesn’t work on fine hair—the braid sections won’t stay distinct, and the whole structure collapses by evening. For thick or medium hair, this is bold summer styling that reads as both polished and fearless when you’re standing in soft evening light at an overlook, looking like you engineered something remarkable.
17. Wildflower Crown Braid for Coastal Vineyard Vibes

You’ll need shoulder-length hair minimum, though longer strands make the crown sit better. The crown braid tutorial curly hair technique works on waves and curls because the texture grips the sections—straight hair needs dry shampoo at the roots first. Start with damp hair, divide into two sections at the crown of your head, and braid each side around toward the back nape, weaving small wildflowers or baby’s breath into the braid as you go. Pin the two braids together at the base using small clips that match your hair color, then gently pull and loosen each section to create that romantic, undone texture that reads as intentional rather than slept-on. This takes 12 minutes once you’ve done it twice, and it holds through an entire afternoon of wind and movement.
18. Sleek High Bun for Rooftop Bar Conversations
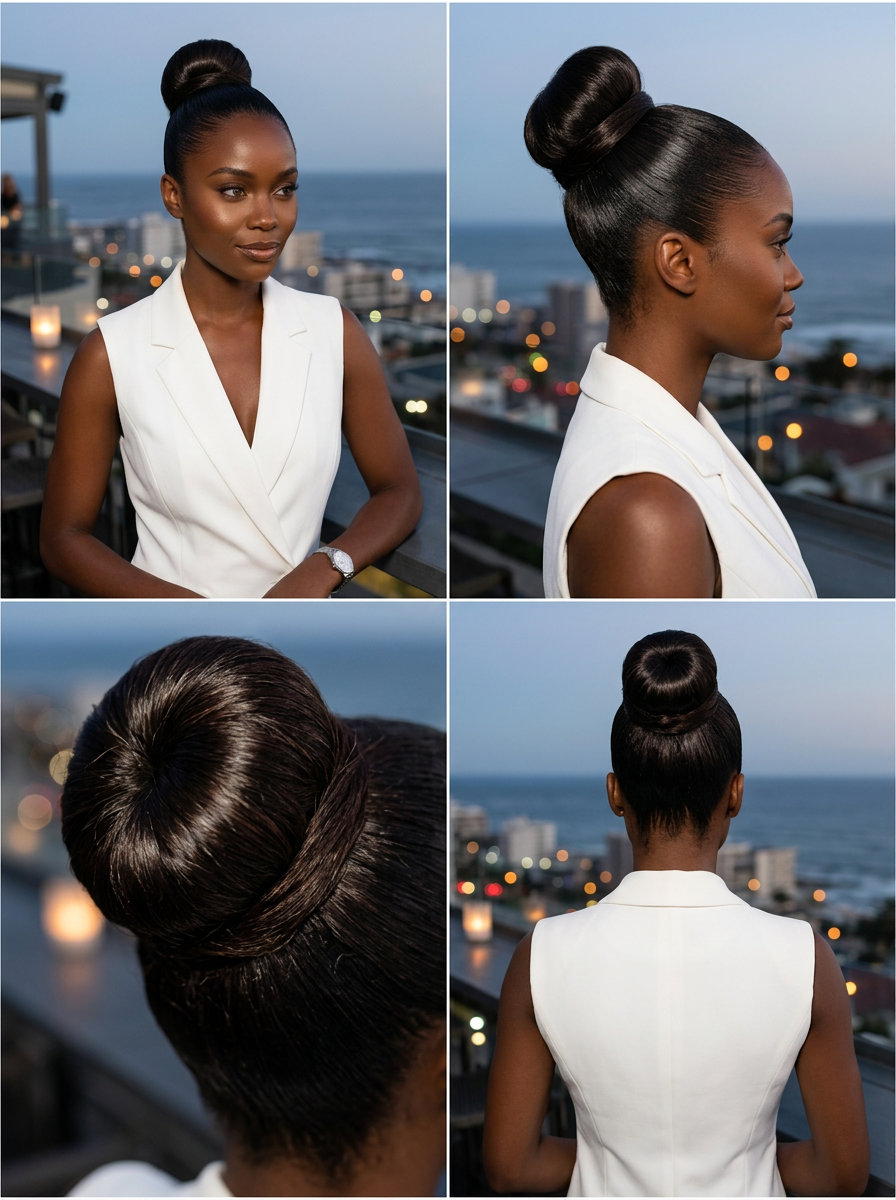
A sleek high bun tutorial works best on straight, fine, or medium-textured hair that’s been blown dry smooth. Blow dry your hair up and back, apply a smoothing serum to the mid-lengths and ends, then gather hair high at the crown—this height is the whole move. Twist the ponytail once, wrap it around itself into a tight coil, and secure with a silk hair tie and two bobby pins crossed underneath. Use a finishing spray designed for hold and shine. The result is minimal, professional, and doesn’t scream effort, which is exactly why it reads as expensive when you’re standing under city lights having a real conversation. This takes 8 minutes max and lasts until you take it down.
19. Tousled Lob Waves for Beach House Mornings

This is the “I woke up like this” lie that actually works on wavy, medium, or thick hair. Blow dry your hair with a round brush, focusing on flipping the ends outward at chin and shoulder length—that’s your lob foundation. Once dry, take a texture spray (the kind designed for wavy hair, not crispy mist) and spray it at the roots for grip, then work it through the mid-lengths and ends in sections. Scrunch with your hands as you spray, really bunching up the hair to create that lived-in, ocean-soaked texture. Tousled lob styling is about making movement look accidental when it’s totally deliberate. The second-day version is better than day one—texture spray alone is your refresh, plus a quick finger-scrunch. Takes 10 minutes if you’re careful with the round brush, 5 if you skip blow drying and just spray and scrunch damp hair, which honestly looks the same by hour three.
20. Messy Fishtail Braid for Beachside Markets

Medium to long, wavy or textured hair is your sweet spot here—straight hair needs to be slightly damp or misted with texture spray first. Start with hair over one shoulder, divide a small section at the temple into two parts, and begin the fishtail pattern: take a tiny thread of hair from the outside of the right section and cross it over to the left, then do the reverse on the left side. Keep the sections thick and loose—this isn’t a tight braid—and you’re pulling small pieces from the edge of each section, not subsections. Once you’ve braided down 8 inches, stop being precious and gently pull and loosen every segment, yanking it wider so the braid looks deliberately wrecked rather than practiced. The messy fishtail braid tutorial is less about precision and more about the aftermath pulling that makes it look sun-weathered and lived-in. Takes 10 minutes your first attempt, 6 by the third, and it holds through shopping, wind, and ocean spray without rebraiding.
21. Still Deciding? Here’s a Quick Comparison
| Hairstyle | Difficulty | Maintenance | Best For | Pros | Cons | |
|---|---|---|---|---|---|---|
| Medium (Bob & Lob) | ||||||
| 1. Crimped Texture with Delicate Hair Chain | Moderate | Low — trim every 8 weeks | Festival, Concert, Theme Party | Low maintenanceSuits most face shapesWorks on multiple textures | Not ideal for fine hair |
| 2. Effortless Sun-Kissed Beach Waves | Easy | Low — trim every 8 weeks | Weekend, Beach Day, Festival | Low maintenanceEasy to style at homeSuits most face shapes | Not ideal for very curly hair |
| 4. The Minimalist Wave Twist | Easy | Low — trim every 8 weeks | Daily Wear, Casual Date, Outdoor Gathering | Low maintenanceEasy to style at homeSuits most face shapes | Not ideal for very curly hair |
| 5. The Chic Riviera Ponytail | Moderate | Low — trim every 8 weeks | Daily, Roof-top Happy Hour, Summer Brunch | Low maintenanceSuits most face shapesWorks on multiple textures | Not ideal for very curly hair |
| 6. The Playful Twisted Half-Up Bun | Easy | Low — trim every 8 weeks | Daily, Casual Outing, Garden Party | Low maintenanceEasy to style at homeWorks on multiple textures | Not ideal for very curly hair |
| 7. Boho Half-Up Twist with Shell Clips | Easy | Low — trim every 8 weeks | Music Festival, Beach Day, Casual Outing | Low maintenanceEasy to style at homeWorks on multiple textures | Not ideal for very curly hair |
| 9. The Summer Side Braid with Charm | Easy | Low — trim every 8 weeks | Weekend, Beach Day, Casual Outing | Low maintenanceEasy to style at homeSuits most face shapes | Not ideal for very curly hair |
| 11. Voluminous Heatless Curls (Sock Method) | Moderate | Low — trim every 8 weeks | Weekend, Casual Brunch, Outdoor Picnic | Low maintenanceSuits most face shapesWorks on multiple textures | Not ideal for very curly hair |
| 13. The Sun-Kissed Tousled Lob | Easy | Low — trim every 8 weeks | Weekend, Beach Day, Casual Brunch | Low maintenanceEasy to style at homeSuits most face shapes | Not ideal for very curly hair |
| 14. Boho Three-Strand Side Braid | Easy | Low — trim every 8 weeks | Music Festival, Beach Day, Casual Outing, Garden Party | Low maintenanceEasy to style at homeWorks on multiple textures | Not ideal for fine hair |
| 15. Glamorous Hollywood Waves | Moderate | High — trim every 3-4 weeks | Formal Event, Summer Wedding Guest, Gala | Suits most face shapesWorks on multiple textures | Frequent salon visits needed |
| 16. Romantic Braided Nape Bun | Moderate | Low — trim every 8 weeks | Date Night, Summer Wedding Guest, Graduation | Low maintenanceSuits most face shapesWorks on multiple textures | Not ideal for very curly hair |
| 17. Sculpted Wet-Look Bob | Moderate | Low — trim every 8 weeks | Date Night, Rooftop Happy Hour, Art Gallery Opening, Fashion Event | Low maintenanceSuits most face shapesWorks on multiple textures | Not ideal for very curly hair |
| 18. Sleek Minimalist Low Bun | Moderate | Low — trim every 8 weeks | Professional, Date Night, Summer Gala | Low maintenanceSuits most face shapesWorks on multiple textures | Not ideal for very curly hair |
| 19. Tousled Lob with Undone Waves | Easy | Low — trim every 8 weeks | Daily, Casual Weekend, Summer Brunch, Shopping | Low maintenanceEasy to style at homeWorks on multiple textures | Not ideal for very curly hair |
| 20. The Avant-Garde Sculpted Updo | Moderate | High — trim every 3-4 weeks | Formal, Gala, Art Event | Suits most face shapesWorks on multiple textures | Frequent salon visits needed |
| 21. The Whimsical Wildflower Crown Braid | Moderate | Medium — trim every 5-6 weeks | Festival, Summer Wedding Guest, Garden Party | Suits most face shapesWorks on multiple texturesNatural-looking dimension | Not ideal for fine hair |
| 22. The Sleek Corporate High Bun | Moderate | Low — trim every 8 weeks | Professional, Formal Dinner, Roof-top Happy Hour | Low maintenanceSuits most face shapesWorks on multiple textures | Not ideal for very curly hair |
| 24. The Effortless Tousled Lob | Easy | Low — trim every 8 weeks | Weekend, Beach Day, Casual Brunch | Low maintenanceEasy to style at homeSuits most face shapes | Not ideal for very curly hair |
| 25. The Sun-Kissed Fishtail | Moderate | Low — trim every 8 weeks | Weekend Brunch, Beach Day, Outdoor Festival | Low maintenanceSuits most face shapesWorks on multiple textures | Not ideal for very curly hair |
22. Frequently Asked Questions
What are the quickest summer hairstyles for busy mornings?
The Effortless Sun-Kissed Beach Waves require nothing but air-drying and sea salt spray—no heat needed. The Minimalist Wave Twist is a half-up style with decorative pins that takes under 10 minutes even on your first try. Both survive the morning commute without rebraiding.
Which summer hairstyles work best for naturally curly or thick hair?
The Voluminous Crown Puff is specifically designed for curly, coily, and thick textures—the more volume you have, the better it looks. The Crimped Texture with Delicate Hair Chain also thrives on thicker hair, since crimping adds dimension without flattening. Both styles actually need your hair’s natural density to work.
Can I achieve these summer looks without heat tools?
The Effortless Sun-Kissed Beach Waves rely entirely on air-drying and texturizing spray—zero heat required. The Voluminous Crown Puff and Minimalist Wave Twist need minimal to no heat as well. If you’re avoiding the curling iron, you have at least three solid options that hold all day.
How can I make a sleek ponytail look more sophisticated for summer events?
The Chic Riviera Ponytail elevates a standard high pony by adding a vibrant silk scarf, ensuring your base is genuinely sleek with edge control, and polishing your hairline. The scarf detail transforms it from gym-ready to rooftop-happy-hour ready in one step. Precision matters here—no flyaways allowed.
23. Final Thoughts
Here’s the truth about pretty summer hairstyles ideas 2026: none of them require perfection, and most look better when you stop fussing with them. The messy fishtail braid that takes six minutes is indistinguishable from the one that took ten, and that’s exactly the point.